How to Measure a Subwoofer: A Comprehensive Guide
When it’s time to swap out an old or damaged subwoofer for a new, top-notch model under $500, precision is key. But relying solely on manufacturer specs often falls short, leaving you with rounded values that might not guarantee a seamless fit into your existing enclosure.
Ensuring a snug fit is especially critical for car trunk installations, where improper sizing can lead to irreversible damage to your brand-new subwoofer. Fear not, as this guide dives into the nitty-gritty of measuring a subwoofer accurately. We’ll walk you through every crucial step, providing insights on what to measure and why, ensuring your replacement fits flawlessly.
From determining speaker and cutout diameters to understanding mounting height, depth, and impedance considerations, we’ve got you covered. Say goodbye to uncertainties and potential mishaps; this guide ensures you measure like a pro, finding the perfect subwoofer that seamlessly integrates into your old enclosure.
Let’s delve into this detailed guide, ensuring you take precise measurements for a subwoofer replacement that enhances your audio experience without any compromise.
Table of Contents
Why Measure a Subwoofer?
Before diving into measurements, understanding why precise measurements matter is crucial. Subwoofers come in various shapes and sizes. Knowing the specific dimensions ensures the replacement speaker fits perfectly into the enclosure without any issues.
Related: How To Test A Subwoofer?
Essential Measurements to Take
- Speaker Diameter: Begin by determining the entire speaker diameter, not just the driver’s size. This step requires measuring across the frame, offering more accurate dimensions than what manuals provide.
- Cutout Diameter: This measurement is vital for the mounting hole. It ensures the replacement subwoofer fits perfectly without any alignment issues.
- Mounting Height: Measuring from the bottom of the subwoofer to the mounting frame ensures the sub sits flush within the enclosure.
- Mounting Depth: Determining the distance from the back of the sub to the frame ensures it doesn’t protrude excessively or sit too recessed within the enclosure.
How to Measure a Subwoofer | Step-by-Step Guide
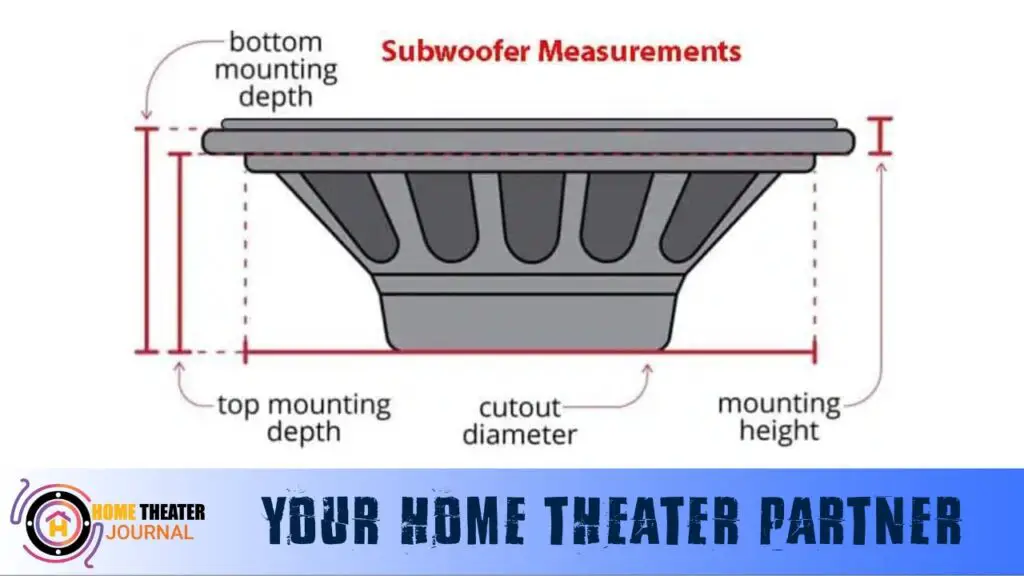
Subwoofer Dimensions
- Step 1: Detach the Subwoofer: Turn off the subwoofer and unscrew it from the enclosure. Remove any grilles that may obstruct measurements.
- Step 2: Disconnect Wires: Carefully disconnect all wires to freely pull out the sub for easier measurement.
- Step 3: Measuring Mounting Depth: Lay the sub on a flat surface and measure from the back to the frame to determine the mounting depth accurately.
- Step 4: Measuring Mounting Height: Measure the distance from the bottom of the subwoofer to the mounting frame.
- Step 5: Determining Cutout Diameter: Flip the sub upside down and measure across from one mounting hole to another. For irregular shapes, measure each side separately.
Mounting Holes
- Step 1: Measuring Hole Size: Place your measuring device across the hole to measure from end to end. Ensure it matches or exceeds the baffle cutout diameter.
- Step 2: Considering Recessed Edges: Measure both the actual hole and the cutout diameter from side to side, ensuring compatibility.
- Step 3: Measuring Enclosure Depth: Use a ruler to measure the enclosure’s depth from the bottom to the cutout’s edge.
- Step 4: Verifying Screw Hole Spacing: Confirm the spacing between screw holes to align with the new speaker’s screw pattern.
Subwoofer Box Cubic Feet
- Significance: The enclosure’s airspace significantly impacts sound quality. Calculating the cubic feet helps determine the optimal volume for the subwoofer.
- Formula: Multiply the enclosure’s height, width, and length, then divide by 1,728 for the overall volume.
Importance of Subwoofer Impedance
- Relevance: Impedance affects the amplifier load. Matching impedance prevents overloading the amplifier and ensures proper functionality.
- Finding Impedance: Look for impedance details on the magnet’s rear or the speaker’s back. Alternatively, use a multimeter for verification.
if you looking for how to reset the subwoofer our post will help you and slove your problems. You just need to follow our step-by-step guide.
Conclusion
Measuring a subwoofer involves multiple critical steps, each contributing to a precise fit and enhanced audio experience. From physical dimensions to impedance considerations, meticulous measurements guarantee a replacement that fits snugly and performs at its peak.
By following this comprehensive guide, you can confidently select a subwoofer under $300 that not only fits flawlessly into your old enclosure but also elevates your audio experience without compromise. Bid adieu to uncertainties and welcome a new subwoofer that seamlessly integrates into your setup, amplifying your sound quality to new heights.
FAQs
1. Why is it essential to measure a subwoofer for replacement?
Answer: Measuring a subwoofer before replacement ensures a perfect fit within the existing enclosure. Accurate measurements of the speaker’s diameter, mounting depth, cutout size, and enclosure volume guarantee compatibility, preventing issues like misalignment, improper fit, or compromised sound quality.
2. What tools are best for measuring a subwoofer accurately?
Answer: Precision measuring tools like calipers, rulers, or tape measures are ideal. Calipers offer high precision for diameter and height measurements of the voice coil, while rulers or tape measures suffice for enclosure dimensions. Using millimeters instead of inches enhances accuracy.
3. How do I measure the voice coil of a subwoofer?
Answer: To measure the voice coil, access it by partially disassembling the subwoofer. Use calipers to measure the coil’s diameter by placing them across the widest part. For height, measure the vertical height of the coil accurately. Double-check measurements for precision.
4. What are the key measurements required for a subwoofer enclosure?
Answer: Critical measurements include the enclosure’s external dimensions (height, width, depth), internal space, cutout diameter for mounting, and calculating the enclosure volume. These ensure compatibility with specific subwoofer sizes, such as an 11-inch sub, for a tailored fit.
5. Can I use manufacturer-provided specifications instead of measuring?
Answer: While manufacturer specifications offer a starting point, precise measurements are recommended. Manufacturers might provide rounded values or general sizes, which might not align perfectly with your enclosure. Accurate measurements ensure a seamless fit and optimal performance.

Author: Baqarrasheed
I know all about home theater items! I have been doing this for more than three years now. I am good with things like sound systems, TVs, projectors, and all that cool entertainment gear. I like to help folks by testing and talking about these gadgets on Hometheaterjournal. I want to make sure everyone can create an awesome entertainment setup at home without any confusion.
I write the creative content for HometheaterJournal.


